Pages

Sunday, October 19, 2014

Cinnamon Applesauce Christmas Ornaments


Hello, fellow crafty people!  Yep, still in holiday mode and just completed my latest craft.  Cinnamon Applesauce Christmas Ornaments.  I have seen these around for years and have never made any.  I came across a few "recipes" on the internet and reviewed the rumblings of its makers.  The ornaments don't seem to dry properly and crumble.  I found a recipe at Food.com (you can follow the link here) and gave it a whirl.  Well, problem solved.  Glue is the solution.  I also doubled the recipe and managed to get a baker's dozen of ornaments.  Remember, because there is glue in the recipe, make sure the kiddos don't try to eat the dough, or feed them to the dog or Dad.  That would be bad.
 
Here's the recipe I used:
 
1-1/2 cups cinnamon
2 tsp nutmeg
1 cup warm applesauce (25 seconds or so in the microwave will do it)
4 tablespoons white glue
 
Mix it all together in a bowl and then knead until stiff.  (The mixture was a bit crumbly, but held together nicely when I formed it into a ball.)


I then worked in batches and sandwiched the dough between some plastic wrap instead of the foil that was recommended so I could gauge the thickness of the dough when rolling it out to 1/4".


I used a nice big snowflake cookie cutter and used a straw to make to hole for the ribbon.  Very important step.  Don't forget!


Then I set them to dry on the rack.  Our house is very cool when it's rainy, so I just let them air dry out for a few days on the table.  I think next time I will try drying them in the dehydrator. 


After they were all dried out, I used an unused nail file to tidy up the ragged back edges.  Worked nicely it did!


I found some pretty red and white ribbons and tied it on the ornament by folding it in half and slipping it through the hole, and then slipping the tails through the loop.  Then I tied a knot at the middle of the ribbon, leaving about a 3" loop for the hanger.  Then I tied a nice little bow at the top to settle the ornament nicely on the branch of the Christmas tree.  I put a little clear nail polish on the back of the bow to secure it and left that to dry.


The cinnamon and nutmeg make the house smell heavenly! 
 
By the way,  there are only 9 Fridays until Christmas!  :)
 

Friday, October 17, 2014

Burlap Christmas Wreath

Well, it's official.  I am in Holiday Mode.  The house is decorated with the standard pumpkin paraphernalia, bright orange berry and leaf garlands, lighted branches, and of course, the smell of my latest candle purchase, Pumpkin Ginger Bark.  (I am addicted to Yankee Candle!)  I made a huge batch of homemade soup with some left over turkey that was smoked on the Traeger, some carmelized onions, kale, carrots, celery, mushrooms, garlic, and some nice dried herbs.  Talk about good!  I'm even more excited because my Mom is coming down from British Columbia for Thanksgiving week!  She hasn't experienced my holiday mode for quite some time, so she is in for a treat!
 
Today, and actually all of this week, I have been in Christmas mode.  Yep, I know it's early, but if the stores can decorate, I can get to making Christmas crafts.  I have always wanted to make my own burlap wreath, but was always intimidated by the gorgeous ones I see on Etsy and in the fancy holiday catalogs.  They look very complicated and intricate, and as a crafter, I do appreciate all the hard work that goes into making such beauties.  Needless to say, I overcame my fear and watched a few videos on Youtube to see how they were made.  I felt silly!  They are very easy to make and just take an hour or so with some easily found supplies.  I found all of mine at Wal-Mart.
 
 
Two rolls of burlap garland, a 18" wire wreath, some ribbons from the Christmas wrapping section, some cute birdie ornaments (sorry, forgot to add them to the photo shoot), floral wire, scissors and wire cutters.  Oh, and a bit of jute twine.  That's it.  Roughly under $15 total to make it.
 
Check out how nice it turned out!


Stay tuned for the next post.  More handmade Christmas goodness to come!
 

Wednesday, September 17, 2014

More Kumihimo Friendship Bracelets

Hello!

I'm on a roll making these pretty bracelets!  There is a craft fair coming up here in December, so I figure I might as well make up a whole bunch of them and start selling what I make.  A friendship bracelet will always make a nice gift for someone.  The bracelets measure 7", not including the toggle clasp, so they will fit most wrists. 
 
Hope you like them and thanks for stopping by!


Wednesday, September 10, 2014

Halloween Kumihimo Friendship Bracelets

Hey, Everyone!

Well, happy "Hump Day"!  Yep, it's the middle of the week and getting close to the middle of September.  Where on earth does the time go.  The weather here has been lovely -- mid 70's with a few clouds, and I heard its going to be hotter by the end of the week.  Here in the Willamette Valley, I believe we are in for a nice Indian Summer.  But, weirdly and sadly, up in Canada, in Calgary, Alberta, they are experiencing snow up the ying-yang.  What is happening with the weather.  I swear the poles are reversing.  My Auntie and some friends have posted some pictures of the snow on Facebook and it is unreal.  Now don't get me wrong, I love a good snowfall, but I think early September is pushing it!

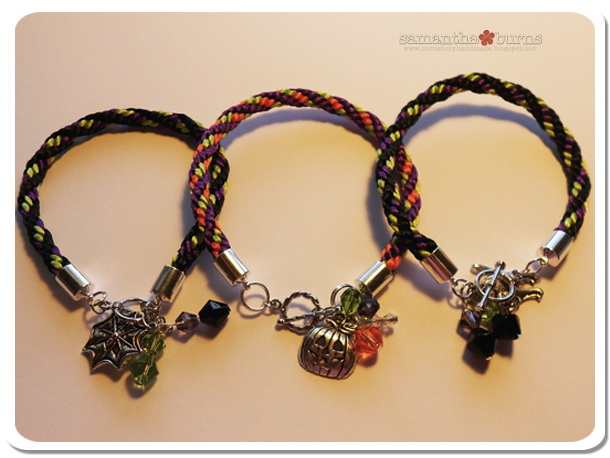
With Fall around the corner, comes another favorite day, Halloween.  While still in Kumihimo mode, I had some Halloween colors of cord in my stash in black, purple, orange and green and got to braiding.  I found some spooky charms and glass crystals to set them off with a toggle clasp.   Darn cute they are!  I can't wait to wear them!  I'll be working on some Fall and Christmas ones too, so stay tuned!


Wednesday, September 3, 2014

Kumihimo Friendship Bracelets

I am a learning addict.  I admit it.  I love to learn new things because there is so much cool stuff out there to learn.  Especially crafts and computer programs.  If it is to be knitted, crocheted, cut, glued, assembled, sewn, glittered, or put on a chain, I am meant to make it.  I have the full versions of Photoshop and Illustrator and have learned a ton on how to use them and there is still more to learn of them.  I have at least 5 physical projects on the go at any given time and at least another 5 swimming in my brain.  I have to limit my perusal of Pinterest, otherwise it's craft overload.
 
My latest addiction is Kumihimo.  This is Japanese braiding using a slotted disc.  This technique makes absolutely beautiful friendship bracelets with just cording and also beads can be added to make the jewelry even more stunning.  It looks intimidating at first, but once you get going, the possibilities are endless.  I came across this most useful of resources -- a Kumihimo Pattern Generator.  Jackpot!  You put in your colors and tweek the pattern to what you would like and it will tell you how many cords you need, where to put them and in once sequence to move them to make the pattern.  Glorious!  Here's the link if you are interested:  http://craftdesignonline.com/kumihimo/kongoh-gumi-friendship-bracelets/
 
Needless to say, I started off simple with a nice pattern that (to me anyway) looked like argyle.  Well, not really, but close enough.  I ordered a kit with everything in it that I needed and then some, and got my Kumihimo on while watching TV in the evening.  Before I knew it, I had created these beautiful friendship bracelets.  I may have to open up a store on Etsy. 
 
Anyway, I hope you like them and I hope you find your inner Kumihimo!


Wednesday, June 18, 2014

Cute Heat Transfer Onesies

Hi, All!

My sweet nephew turned 1 this month, so this was a perfect opportunity for me to get crafty and make him a birthday present.  I found the onesies online at Amazon.com (they came in a 4-pack) and did a search on Pinterest for some ideas that would be cute to make some heat transfers for them.  The Silhouette Studio online store had the perfect shapes and fonts, and I used the Silhouette brand black flocked heat transfer.  Although the instructions say to iron on for 45-60 seconds, 3 minutes or so is what it takes for my iron to get the transfer to stick.  The results turned out adorable!


I think the embellishments on the backside were just the ticket!
 

Friday, June 6, 2014

Fridge Chalkboard Vinyl


Well, our new fridge came in a couple weeks ago and it is absolutely glorious!  A choir sings in my head when I open the French doors and see all that wonderful space in there!  It is very large, though, and our kitchen is very small.  And because it is so small, we chose white instead of the ever popular stainless.  Otherwise, it would have looked like an elephant had made it's home in our kitchen.  I decided to jazz it up some with a very useful chalkboard.  I had some chalkboard vinyl in my stash and found some pretty dragonfly flourishes in the Silhouette library.  The Cameo cut everything out nicely using a doublecut; the chalkboard vinyl is a bit thicker than the regular vinyl.  The flourishes weeded out beautifully intact and I hated to waste them, so on the fridge they went as well.  Now, we have a nice memo board for groceries and the "Honey-do" list.


Bye for now!

Thursday, June 5, 2014

Apples & Peanut Butter Yogurt

Hey, Everyone!
 
The Hubby and I are on a quest for better health and to also shed quite a few unwanted pounds.  We've learned that in order to lose weight, you do have to eat.  I was a horrible eater.  I didn't like breakfast, definitely didn't have a snack, lunch was whatever I could find in a pinch, and I really over did it at supper.  I love supper.  Roasted whatever on the Traeger, potatoes, pasta casserole, maybe some veggies, and throw in some home baked bread.  Mmmm, that was what I liked.  My metabolism must have figured I was a bear going into hibernation because by eating the way I was, I was telling my body to store up fat for the winter.   And it did.
 
So, now when I go grocery shopping I grab carrots, celery, and peppers and cut them up to fit in the little snack bags for snacks during the day.  Works out to be a cup of veggies in the bag.  I try to have at least 2 veggie bags during the day, have lots of veggies and/or salad at supper.  For my morning snack, I like to make a smoothie with the V8 Fruit Fusion Pomegranate and Blueberry (there's tomatoes in this juice, not just carrots), a tablespoon of psyllium fiber and a scoop of whey protein.  I have that after I exercise at Curves.
 
My afternoon snack requires a smart carb, a protein, and a veggie pack.  My smart carb of choice is a nice small Gala apple.  Peanut butter is a great protein, provided it is a natural peanut butter;  roasted peanuts and salt.  That's it.  Apples and peanut butter taste great together, but it was kind of difficult to scoop the peanut butter on the apples.  And the portion of peanut butter was only a tablespoon.  Not a lot.  So, I decided to try and mix it with some plain 0% fat Greek Yogurt in equal portions (half a cup of each), and added a small squirt of honey in with it.  Mix it all up good together and voila,  Peanut Butter Yogurt Dip.  Delish!
 
I think this is a great snack for kids and adults alike!
 

Take the time to eat something healthy!

Thursday, May 15, 2014

A Meal without Wine

A fun way to dress up a large, blank spot is with some word art.  Look online and find a phrase you love that fits perfectly with your mood or space.  Our wine fridge was looking like a black hole in our family room.  I happened by chance across this saying and found it was perfect for the wine fridge.  I had some white Oracal 631 in my stash and used my Silhouette Studio to design the word art and the Cameo to cut it out.  Tip:  Put a cut line across the page between your words -- weeding in sections is a lot easier than trying to be careful with the whole design at stake!
 
 
Cheers!
 

Wednesday, May 7, 2014

Dehydrated Lemons

Hey, Everybody!
 
I bought a food dehydrator a couple weeks back and have been experimenting with different kinds of veggies to make some nice, healthy snacks.  First, I did cucumbers.  Two cucumbers was perfect.  I washed them good and sliced them up thin (about an 1/8th or so) and soaked them in vinegar for about an hour or so while I went and did my exercising at Curves.  My dehydrator has 4 trays so everything fit on them nice.  I sprinkled them with dried dill and garlic powder, but I forgot to salt them too.  After all was said and done (8 hours seemed just right), they were nice and tangy but really needed the salt too.  Next time, I'm going to do the cucumbers with malt vinegar and sea salt.  Mmmmm....
 
Next, I did green zucchini.  I soaked these in vinegar too, sprinkled salt,  garlic powder on them.  I took them off at 5 hours, not as much moisture in them I guess.  Tasty snacks, but needed more salt.  Eggplant was next on the list to try.  I had had eggplant roasted in the oven before and it was horrible.  Just couldn't get around the spongy texture.  But, I decided to give it another chance and put it in the dehydrator.  Salt, garlic powder and paprika and off they went for 8 hours.  Not bad at all.  Still needed more seasoning and they were good with some ranch dressing to dip them in.  Note to self:  Don't be shy with the seasoning.  Load them up with flavor!  So, that's what I did with my last zucchini batch; salt, garlic powder and Parmesan cheese.  Darn good for sure!
 
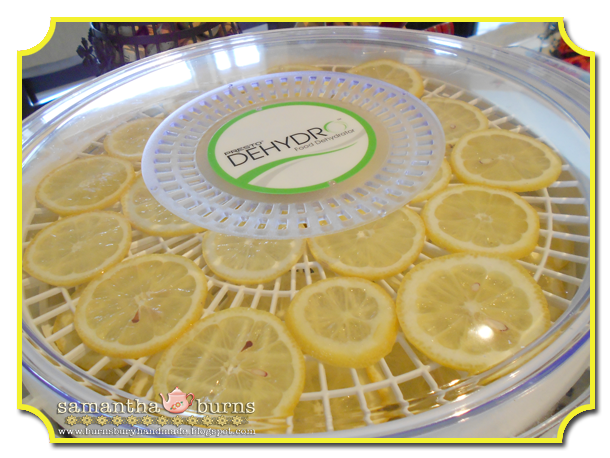
Next, I dehydrated lemons.  The house smelled so nice and fresh all day long.  They dried up perfect and crunchy, and super tangy with all that nice condensed flavor in them.  Afterward I put them in the food processor and pulverized them to little bits.  I had some small, half pint canning jars in the back, so I put my lovely lemonness in one of them and thought the jar looked a little naked.  I opened up my Silhouette program and found some cute designs to use for a print and cut to make a label for the top of the jar and a cute lemon tag to match.  I even made some for the limes and oranges I have dehydrating now.  These will be a perfect addition to my pantry.  Now, when I need a sprinkle of lemon or lime or orange for pasta or salad dressings, a teaspoon of the dried stuff will be perfect and loaded with flavor.  Love it!


These would make a nice gift for someone too!
 
Stay crafty, my Friends!

Thursday, May 1, 2014

Wine Cork Decor

We have an abundance of wine corks in a cute container on the counter.  Had no idea what to do with them all.  Searched Pinterest and came across an idea for those décor balls that you see on a coffee table or in a large glass vase.  Hmmm.  The wheels in my head turned quite a bit, then I headed to Walmart's craft section and found a pack of Styrofoam balls.  I think they are about 4" in diameter.  Got out the hot glue gun and glued the corks to the balls (and burned my fingers in the process too!).  After they were done, they looked goofy.  Just wine corks glued to a Styrofoam ball.  What do I fill in the gaps with?  Back to Walmart and in the floral department I found sheets of moss on clearance.  Jackpot!  I cut the moss into small squares (maybe 1" or so) and used small straight pins to pin them in the gaps between the corks.  Took forever, but the result was much better!


I see Christmas decorations being my next wine cork craft -- Stay tuned!